
A couple months back, there was a lot of hype around Mastodon and the Fediverse - a de-centralized social platform that some people were heading towards away from Twitter. While I won’t be migrating off Twitter, I did want to see what the platform was all about, as well as have a way to continue to connect with those friends who had left for Mastodon.
I spun up an Ubuntu server in an Azure B series VM, with 1cpu and 2gb ram. Since this would be a single user server, I wasn’t concerned about performance, scale, or any uptime requirements. After spending a couple hours installing the Mastodon software, using Let’s Encrypt for an SSL cert, and pointing an available hostname to the IP of the Azure VM, I was up and running! Inside Azure, I disabled all ports except for 443 inbound, only opening 22 (ssh) when I needed to console in and run updates. This setup worked quite well for 3 months.
After playing with Cloudflare tunnels for a while as a replacement to a traditional VPN into my homelab, I realized that I could also use another tunnel to expose my Mastodon server to the internet from my homelab, without the need for any open ports, or static IPs. So a new VM was spun up in my homelab, and Mastodon installed and configured. But, I did not use Let’s Encrypt this time.
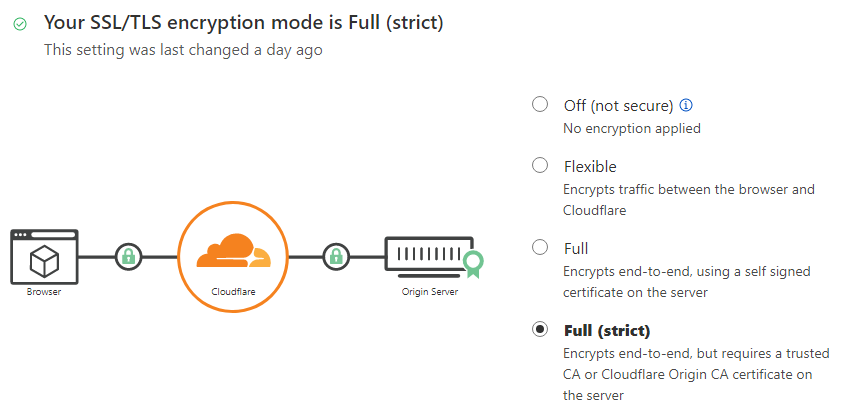
With the way that Let’s Encrypt verifies the server, it requires DNS to resolve back - but using Cloudflare caching (let alone Tunnels) would break this process. Thankfully, Cloudflare can handle all the SSL itself. So to start off, a domain needs to be registered in Cloudflare for DNS usage (Cloudflare does not have to be the registrar). In my case, I used tsmith.io. Under that domain, I selected SSL/TLS and on the Overview page, made sure to enable Full (strict) from the listing. This means that Cloudflare will have the trusted and signed certificate facing the outside world, and that my server would require a certificate signed by Cloudflare installed so Cloudflare could trust it.
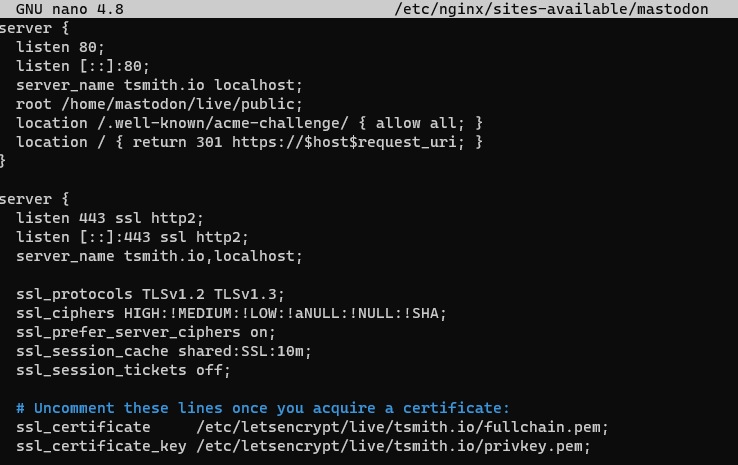
To generate a certificate to install on my Mastodon server, I navigated to Origin Server under the SSL/TLS section, and chose Create Certificate. I left the default of RSA 2048 for the private key type, as well as the defaults for the hostnames (*.tsmith.io and tsmith.io). 15 years seemed likely to last me for this server, so I clicked Create. On the next screen, I copied the text from each box, and saved to files I called fullchain.pem and privkey.pem. Next, I added these files to my Ubuntu server, and edited my Mastodon servers nginx config (/etc/nginx/sites-available/mastodon) to point to the pem files. (I simply placed them in the letsencrypt directory that was already in place since the configuration file was already pointing there, and uncommented the lines). I also made sure to uncomment the lines for 443, and added tsmith.io and localhost to the server_name line, saved the file, and restarted nginx.
Now it was time to setup a Cloudflare Tunnel for this server. First step was to open up the Zero Trus t link from the main navigation menu from Cloudflare, and drilling down to Access, and Tunnels. I chose to Create a tunnel and named it “mastodon” and clicked Save Tunnel. On the next page, I entered in the Public Hostname information of my domain name tsmith.io and setting a service of HTTP to point to localhost:80, and clicked Save Tunnel again.

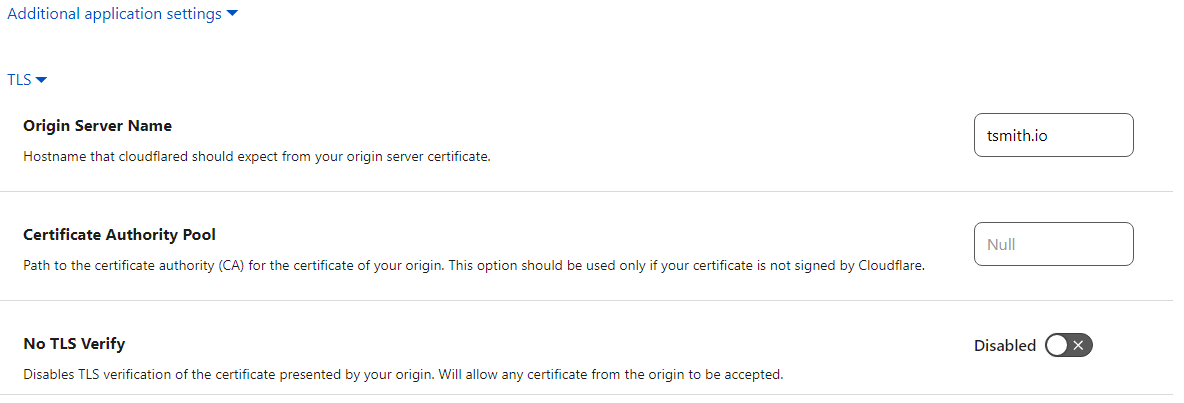
Once the tunnel is saved, there was still some configuration needed, so I chose to edit my mastodon tunnel, and go back to Public Hostname. I added an additional hostname of tsmith.io and setup this service for HTTPS and the URL of localhost:443. Next un der Additional application settings, and TLS, I set the Origin Server Name to my domain name, tsmith.io and clicked Save Hostname.
Finally, it was time to actually install the Cloudflare tunnel into my Ubuntu server. Back on the Overview page for my tunnel, I clicked on Debian to get the code to install my tunnel with it’s token. Since I did not yet install cloudflared onto Ubuntu, I selected the code on the left to download, install, and setup the service on my server. (this is not my actual token!)
curl -L --output cloudflared.deb https://github.com/cloudflare/cloudflared/releases/latest/download/cloudflared-linux-amd64.deb &&

sudo dpkg -i cloudflared.deb &&

sudo cloudflared service install eysfgkERTJsgmwErksdfSjsSDFgsdfgaWaEAYTFUfghsdQwasgDFGsDthrdtuhFsaersdFGxdfhdfthfdDSSArdgfhDSGhdfhgADIzMWJhOTRiSDFsdfsDFKSKeeskfdSdfskhFREDSaDfzcZDvDFFgdfgxVsdSDfSXCvxdsfdgXXCSdfsasdfhfgjhvBNGHdsdfsdf
I pasted it into my SSH session and my Tunnel showed up as Healthy in Cloudflare!

Now, I could finally access my Mastodon server using it’s hostname tsmith.io from anyway, while the server sat safely in my homelab with no ports exposed and no static IP required from my ISP.