
Now that I’ve got some shared storage setup for the lab environment, it’s time to get some ESXi 5.1 hosts. Since this is a lab environment, I want to run some nested ESXi 5.1 hosts.
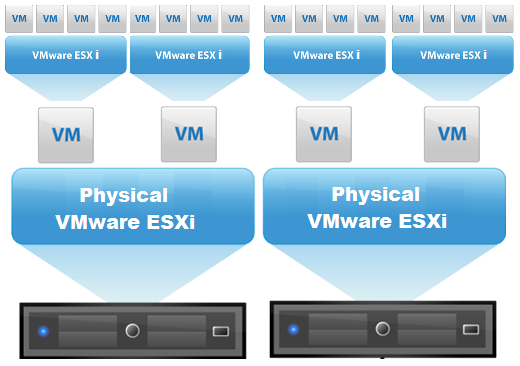
Running nested means installing a hypervisor inside of another hypervisor. This could be XenServer, Hyper-V, or ESXi. Obviously, I recommend the later! You can install and run VMs on top of the nested ESXI install, and they can be 64bit, but that depends on the CPU.
I had already blogged about running a nested setup previously, however, there are enough changes from 5.0 to 5.1 to merit a new post and instructions.
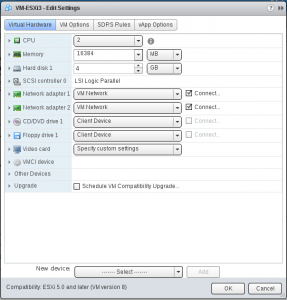
The first step is to create a new VM. When choosing an opertating system, just choose “Other 64 bit”. We will change that later. I gave my VMs the following:
- 2 vCPUs
- 16 GB RAM
- 4 GB Hard Disk
- 2 NICs
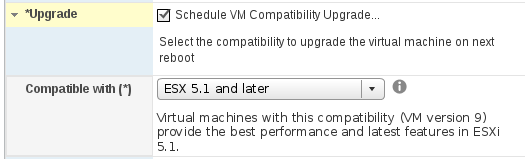
For our Nested ESXi server, we will need to make sure that it is hardware version 9. When I created a VM with the Windows client, it was version 8, and I had to upgrade the VM hardware; however, with the web client, the default was hardware version 9. If you are version 8, simply edit the VMsettings, and choose to schedule VM compatability upgrade, and choose “compatable with ESX 5.1 and later”.
At this point, we need to enable VT and EPT (or AMD-V and RVI) support on our new VM. Your CPU may or may not support this. In fact, ESXi 5.1 is more strict! In ESXi5, you could run 64bit Windows on a nested ESXi box, even if you didn’t have the proper support for EPT or AMD RVI. In 5.1, you are required to have a CPU that supports EPT or AMD RVI.
To check, browse to https://your-esxi-ip-here/mob/?moid=ha-host&doPath=capability and look for NestedHVSupported.
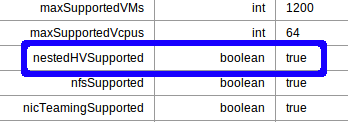
If it is false, fear not – you can still run 32bit windows on your nested ESXi hosts.
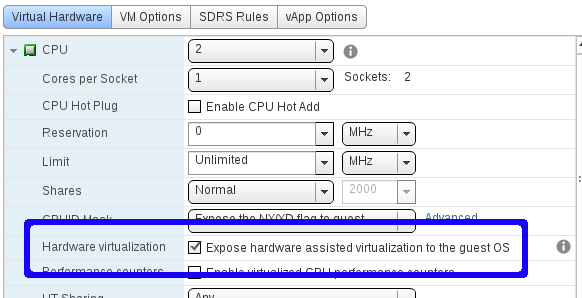
At this point, we will need to enable Hardware Virtualization in the Guest:
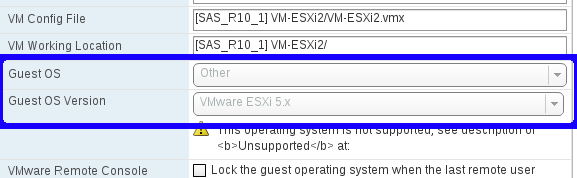
And also, change the Guest OS type to Other, ESXi 5.x. Note! Currently, this can’t be done in the vSphere Web Client, and for now will have to be changed in the Windows client. (Edit Settings)
Finally, we need to enable Promiscious Mode on our vSwitch, just like in our Nested ESXi 5.0 environment.
We need to make sure the networking is setup properly. On each host, for your VM Network, enable promiscuous mode for the port group.
- click Configuration
- click Networking
- click Properties for your vSwitch with the VM Network (assuming your haven’t renamed”
- Click “VM Network” and choose Edit.
- Click Security
- Check Promiscuous Mode and choose Enable.
That’s it! Simply mount your ESXi ISO, and install inside the VM.
In the next post in the vSphere 5.1 Lab, we will install the vCenter Server Appliance, and attach our Nested ESXi hosts to it to create clusters, etc.

Hi Tim,
I try to configure a fully operational lag using Workstation9 and for some reason FT is not working.
Any clue about how to hack this?
vMmotion and all other features are working perfectly.
Here is my setup:
ProLiant DL360
44GB RAM
2 x Xeon X5675
some HDD
Software:
VMware Workstation9
Open-E DSS
ESXi
vCenter
On the HostCapability I have this entry:
ftCompatibilityIssues ¦ string[] ¦ “incompatibleCpu”
ftSupported ¦ boolean ¦ false
Any advice?
I haven’t tried that out yet, but take a look at virtuallyGhetto’s article here. http://www.virtuallyghetto.com/2011/07/how-to-enable-nested-vft-virtual-fault.html
This may solve your issue.
Thanks for support,
Unfortunately it is not working on 5.1.
I will continue to search.