
I’ve done a fair amount of installs of this combination, Veeam and EMC’s DataDomain deduplication device. The solution is a wonderful combination – but the number 1 complaint is that it is slow……..slower than it should be.
Why is it slow? Well, the short answer is because of the CIFs implementation on the Data Domain. From testing, transferring data via CIFS is about 45% slower than transferring files using NFS.
Since windows and Veeam don’t natively support NFS, the solution is to deploy a linux proxy server to act as the go between. In essence, we go from Veeam –> DataDomain, to Veeam –> Linux proxy –> DataDomain.
Step 1: Deploy a linux VM
- This can be any flavor – I choose Ubuntu Server since I am most familiar with Ubuntu.
Step 2: Mount the DataDomain NFS Share on the Linux VM.
- With Ubuntu, I had to install the NFS-common package
sudo apt-get install portmap nfs-commmon
- Next, let’s make a folder that the NFS share will mount to
mkdir /mnt/datadomain
chattr +i /mnt/datadomain
- Next, we need to setup some parameters, and mount the NFS share by typing the following:
echo 262144 > /proc/sys/net/core/rmem_max
echo 262144 > /proc/sys/net/core/wmem_max
echo 262144 > /proc/sys/net/core/rmem_default
echo 262144 > /proc/sys/net/core/wmem_default
echo ‘8192 524288 2097152’ > /proc/sys/net/ipv4/tcp_rmem
echo ‘8192 524288 2097152’ > /proc/sys/net/ipv4/tcp_wmem
echo 2097152 > /proc/sys/net/core/wmem_max
echo 1048576 > /proc/sys/net/core/wmem_default
/sbin/service nfs start
“mount -t nfs -o nolock,hard,intr,nfsvers=3,tcp,bg (datadomain IP):/data/share /mnt/datadomain”
- Your Linux server should now have the NFS share mounted in the /mnt/datadomain directory.
Step 3: Add the linux server to Veeam
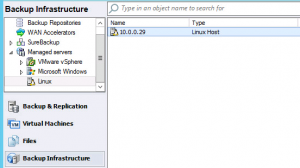
- Under Backup Infrastructure, Choose to add a new Linux host, and enter in the IP and credentials for the linux server.
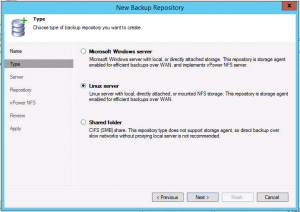
- Now, under the Backup Repostories, add a new repository.
- Choose the type Linux Server
- Choose your Linux VM from the drop down, and then click populate
- Choose your NFS share (or click next, and browse to it)
- After clicking next, choose advanced and un-check the boxes.
- Finish out of the wizard.
Step 4: Setup your backup jobs to this new repository
- You are now ready to setup backup jobs and point them to this repository.
- Remember to edit the job settings and disable in-line deduplication, and un-check compression.
Results:
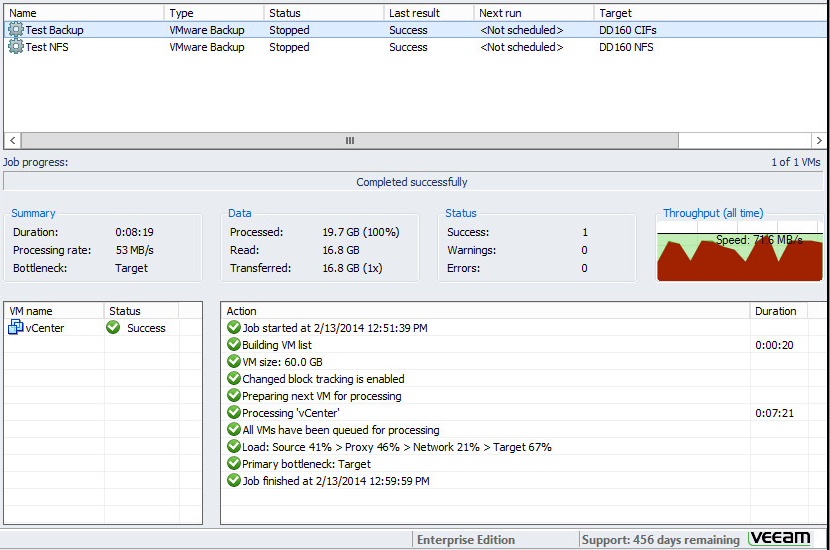
- Veeam connected directly to CIFS share – 53MB/s
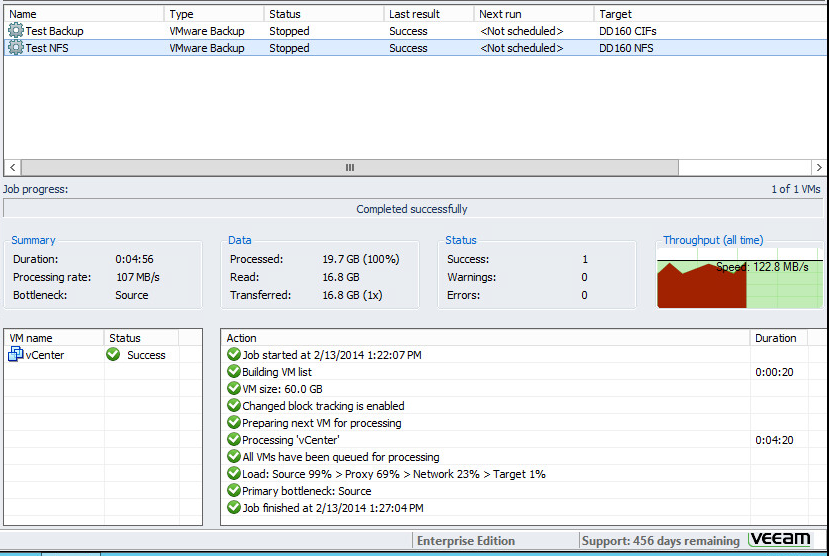
- Veeam connected using Linux proxy and NFS – 107MB/s


Tim, to protect against possible backup job corruption in the event DataDomain is down or NFS broker has dismounted the NFS share, add this step just after creating the NFS mount point directory:
chattr +i /mnt/datadomain
so it’ll look like:
mkdir /mnt/datadomain
chattr +i /mnt/datadomain
This will cause Veeam jobs to fail rather than writing the backup data chain onto the local NFS broker’s hard disk causing a break in the backup chain.
Thanks! Added that info to the post
Tim,
Could you please provide a brief explanation of how those tweaks help to improve performance? I’m always wary of tuning system parameters I’m not familiar with (both in general and in context). But a very useful post! I’ll be rolling out a test setup today.
By using the linux VM as a proxy to the NFS storage – we can utilize much more of the link – as the data domain has much higher transfer speeds via NFS than CIFS.
Sorry, my message was a bit unclear. Using NFS is faster, yes, but I’m wondering about the system tunables. What do they do and why are they needed for a Veeam proxy?
echo 262144 > /proc/sys/net/core/rmem_max
echo 262144 > /proc/sys/net/core/wmem_max
echo 262144 > /proc/sys/net/core/rmem_default
echo 262144 > /proc/sys/net/core/wmem_default
echo ‘8192 524288 2097152′ > /proc/sys/net/ipv4/tcp_rmem
echo ‘8192 524288 2097152′ > /proc/sys/net/ipv4/tcp_wmem
echo 2097152 > /proc/sys/net/core/wmem_max
echo 1048576 > /proc/sys/net/core/wmem_default
Ah! My mistake 🙂 These values are straight from the Veeam and EMC documentation for using NFS with datadomain. The tweaks basically adjust the buffers for the linux VM’s networking stack. This article has great explanations for those settings – http://www.cyberciti.biz/faq/linux-tcp-tuning/
Perfect! I’ve seen that document but didn’t recall reading those values in it. Thanks for clarifying!
Pingback: Veeam and DataDomain using DD Boost | Tim's IT Blog