
Nutanix CE, or Community Edition, is the free community supported hypervisor of Nutanix. Nutanix CE allows you to create a hyper-converged infrastructure on your own hardware, running AHV (Acropolis Hypervisor.) Nutanix in production can use Acropolis, Hyper-V, or VMware as the hypervisor of choice.
Recently Veeam released support for Nutanix’s AHV hypervisor, allowing for agentless backups of virtual machines running in Acropolis. Since I don’t have a Nutanix cluster at home, I decided to make one! Since I run a lot of VMware based workloads, I decided to install Nutanix CE inside a VMware virtual machine.
Don’t want to read? Go watch the video at the bottom of this post!
First Thing’s First
The very first step is to download the community edition, which can be found here:
https://www.nutanix.com/products/community-edition/
You should now have a file name ce-2018.01.31-stable.img.gz (versions will vary as time progresses) I used 7zip to unzip the archive, leaving me with a ce-2018.01.31-stable.img file. Next, rename the file to ce-flat.vmdk, as this will be uploaded to the vSphere datastore.
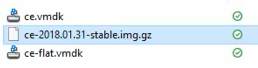
One thing that is missing is the disk descriptor file. Thankfully, I had found one already written by Joep Piscaer. Copy the text and save as ce.vmdk
# Disk DescriptorFile
version=4
encoding=”UTF-8″
CID=a63adc2a
parentCID=ffffffff
isNativeSnapshot=”no”
createType=”vmfs”# Extent description
RW 14540800 VMFS “ce-flat.vmdk”# The Disk Data Base
#DDB
ddb.adapterType = “lsilogic”
ddb.geometry.cylinders = “905”
ddb.geometry.heads = “255”
ddb.geometry.sectors = “63”
ddb.longContentID = “2e046b033cecaa929776efb0a63adc2a”
ddb.uuid = “60 00 C2 9b 69 2f c9 76-74 c4 07 9e 10 87 3b f9”
ddb.virtualHWVersion = “10”
We now have ce-flat.vmdk and ce.vmdk. Upload those to a VMware datastore to be used by our virtual machine.
Create the VM
Now that we have the disk, it’s time to create the virtual machine for Nutanix CE.
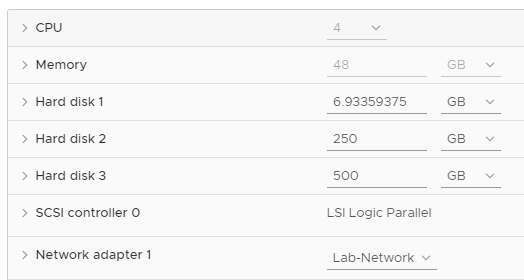
Create a new VM with the following options:
-
CPU
- 1 socket, 4 cores
- Expose hardware assisted virtualization to the guest os
-
RAM
- 16gb min
- I chose 48gb to give the CVM adequate resources and allow for some virtual machines
-
Disks
- Hard Disk 1: point to existing ce.vmdk file on datastore
-
Hard Disk 2:
- SSD based
- Minimum 250gb
- I chose an SSD based datastore, and thin provisioning
-
Hard Disk 3:
- Capacity drive
- 500gb minimum
- I chose my capacity datastore, and thin provisioning
-
Network
- 1 nic
When it’s all setup, it should look like this:
Ready for liftoff!
Now it’s time to power on the VM! When it first boots, there are two options – normal boot, and rescue mode. For some reason, normal boot would not work for me, however, rescue mode was just fine, so I proceeded with that option.
Since we are running in a VM, we will need to make a couple changes before we proceed with the install. When at the login screen, login as root with the default password of nutanix/4u
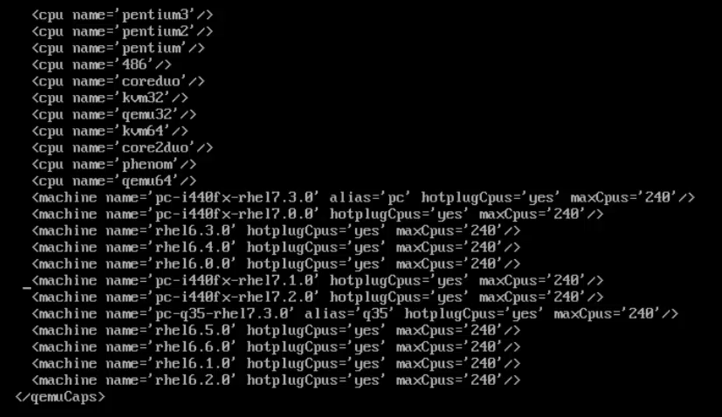
Change directory to: /var/cache/libvirt/qemu/capabilities/ and do an “ls” to see the xml file. Edit that xml file (I use nano).
At the very bottom of the file, is a listing on machine types. Remove the line that has “pc-i440fx-rhel7.2.0“. Next, edit the line that has “pc-i440fx-rhel7.3.0” and change it to “pc-i440fx-rhel7.2.0”
Save the file, and exit your editor.
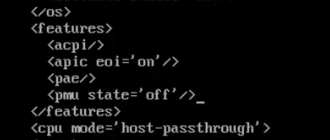
Then, edit /home/install/phx_iso/phoenix/svm_template/kvm/default.xml
Add the line: <pmu state=’off’/> inside the <features></features> tag. Again, save and exit. Now reboot the machine.
Time for Install
Boot the VM again (I had to chose rescue mode) and follow the normal install procedure by typing “install” at the login prompt.
Select your keyboard language and proceed.
Next, Nutanix CE will want to verify the performance of the attached disks (Hard Disk 2 and Hard Disk 3).
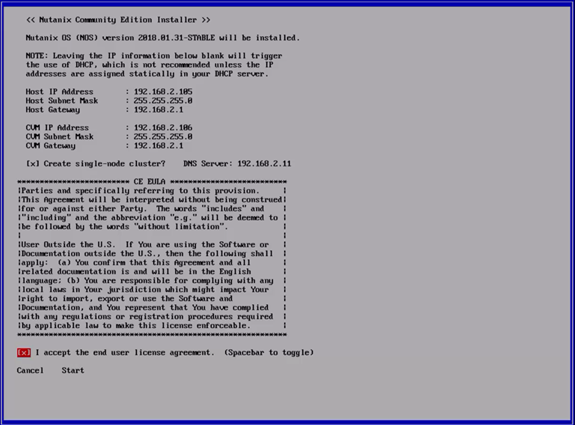
Finally, Enter in IPs for the Host and for the CVM to consume, and accept the Eula. (You have to scroll through the entire eula to proceed). (If running only a single CE vm, select the “create single-node cluster” box)
Up and Running
Once the Nutanix CE VM reboots, open up your browser and point it to the CVM IP address you set.
Login with the default credentials of admin and Nutanix/4u and then change the admin password.
Finally, the very last step is to enter in your NEXT credentials, to tie the CE deployment to your community account. Once entered, you are now in the Prism interface, where we can configure virtual machines and more importantly, deploy the Veeam AHV proxy appliance. Stay tuned for the next post where we will deploy the Veeam proxy!
It doesn’t work properly with latest versions of Nutanix CE unfortuntely.
I just tested – the new ISO deployment method doesn’t work, but using the image based install with the new version still works for me following this method.
Pingback: Random Short Take #7 | PenguinPunk.net
FYI if you use SATA mode (VMware Workstation) for the disks you won’t need to boot in recovery mode. There is probably a disk controller mode in ESXi that’ll work too.