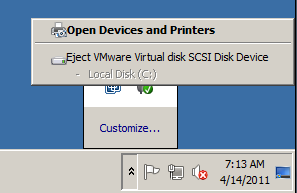
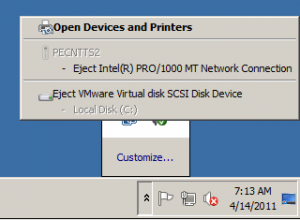
It was pointed out to me by a co-worker that the NIC in a VMware virtual machine shows up as a removable device in the system tray. While this may not seem like a big deal, it actually can be. If you choose to ‘eject’ the nic, not only does it disappear from windows; but it will also no longer be in the hardware list of the VM’s settings. A new nic would have to be added, and then windows would see a new mac address, and it’s static IP will be lost. This can be a larger problem if the VM is a Terminal Server, and has multiple users logging on.
VMware has KB article 1012225 that documents how to disable to hotplug capability by editing the VM’s .vmx file. This appears to not work for Server 2008 and 2008 R2 in vsphere 4.0, but is fixed in 4.1. However, I am not a fan of editing .vmx files and it will disable hotplug for all devices in the VM – so I decided to take the hotplug capability away in windows for only the NIC.
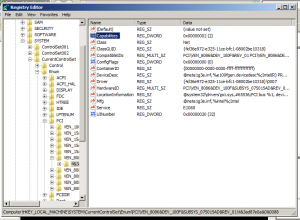
To disable the hotplug capability of a VMware nic in Windows Server 2008, we have to edit the registry. The values are located in:
[HKEY_LOCAL_MACHINE\SYSTEM\CurrentControlSet\Enum\PCI\VEN_8086&DEV_100F&SUBSYS_075015AD&REV_01\4&3ad87e0a&0&0088] (Verify this is correct by finding a key “service” with a value of “E1G60”.)
The first problem is that part of the registry is protected, and administrator does not have access. You can edit the permissions to allow Administrator editing (not recommended), or you can use SysInternals PSTools. This will allow us to open and edit the registry as the Local System Account. Once downloaded, run the following command:
Psexec -i -s regedit
Navigate to the above key, and change “Capabilities” to 4 less than it’s current value. (Change to 2 if the value shows 6, or 0 if it was 4).
Now comes the second problem. The NIC is now no longer listed in the “safely remove hardware” list, but after a reboot – the registry value will return to it’s default value. To overcome this, we simply need to export the registry key that we edited to a .reg file, and then create a batch script with the following code:
Regedit /s c:\scripts\disable-nic-hotplug.reg
Save this .bat file, and then open the local security policy by going to <Start>, Run, and type “gpedit.msc”.
Navigate to [Computer Configuration] – [Windows Settings] – [Scripts] and select Starup in the right pane. Add your batch script to the startup list.
Now, during every reboot, the script will run as Local System Account and will reset the registry entry to the proper value. Problem Solved.
If you want to edit the .vmx file instead, this will work for Server 2003 in vsphere 4.0 and for 2003, 2008, and 2008 R2 in vsphere 4.1. You can add the required change using the vSphere client, or editing the .vmx file manually via the ESX Service console or rCLI. I’m going to only cover using the client.
- Shutdown the Virtual Machine.
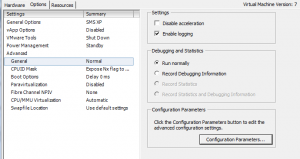
- Right click on the VM and choose “Edit Settings”.
- Choose the Options Tab
- Highlight “General” listed directly below “Advanced”.
- Select the “Configuration Parameters…” button.
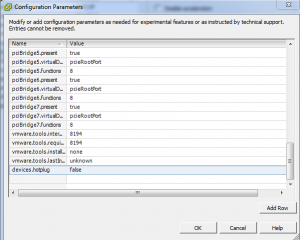
- Click the “add Row” button.
- Enter “devices.hotplug” for the name, and “false” for the value.
- OK out of windows.
 Using this option instead of editing the windows registry will disable all hotplug options for the VM (except CPU/ memory), not just the NIC. So, hard drives will no longer be able to be added and removed live. This is the biggest concern I have with using the second method, because I have found multiple instances where I need to add/remove a new virtual drive.
Problem Solved.

Pingback: Removing “Eject VMware Virtual disk SCSI Disk Device” | Helge Klein | Home of SetACL