
To kick off the series on the blueprint for the VCAP-DCV exam, I thought I would start at the beginning. I will split objective 1.1 into 3 parts:
Objective 1.1 – Perform advanced ESXi Host Configuration
Skills and Abilities
- (Part 1) Configure and Manage Auto Deploy configurations
- Determine use case for Stateless vs Stateful installs
- Create / Modify rules and rule sets
- Create and associate Host Profiles for an Auto Deploy reference host
- (Part 2) Configure Kernel Boot Parameters for scripted install according to a deployment plan:
- Modify scripted weasel install (ks.cfg)
- Create / Modify scripted installation
- (Part 3) Configure Advanced System Settings according to a deployment plan:
- Edit System Swap / Scratch Configuration
- Configure ESXi host to use a central Syslog Server
- Manage/Edit the Core Dump configuration of an ESXi host
The first thing to cover is stateful vs stateless installs. When using auto deploy, we push ESXi from the autodeploy server into the host’s ram and boots ESXi.
In a stateless install, the ESXi server (usually) won’t have any local storage, and if powered off, the ESXi isntall and configuration is lost. However, in a stateful install, ESXi is pushed to the host in the same manor, but is installed onto local disk to boot from in the future. Stateful install is a great way to install ESXi on a large number of hosts at once.
In our lab, we will perform a stateless install. The lab consists of:
- vCenter Appliance 6u1
- Windows 2012 R2 – DC, DHCP
- Empty VM for ESXi
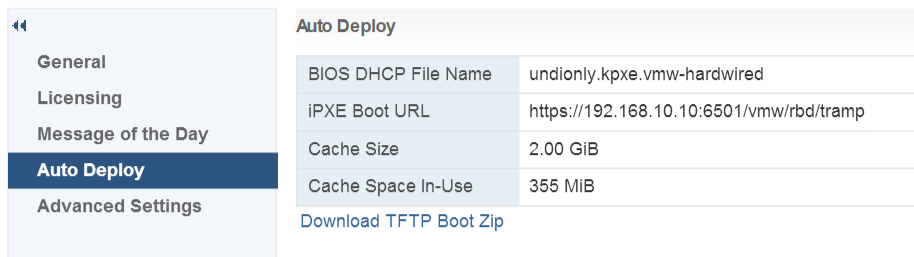
The first step is to enable the autodeploy service on the vCenter appliance. Using the web client, browse to Administration > System Configuration > Services > Auto Deploy. Select the the Actions drop down menu, and set the startup type to automatic. Then, start the service.
Next, we need to setup DHCP. Create a MAC reservation for the ESXi host, and in our instance, we reserved 192.168.10.81. For Auto Deploy to work, 2 DHCP options need set.
- Option 66 – 192.168.1.3 (The IP address of the TFTP Server)
- Option 67 – undionly.kpxe.vmw-hardwired
![]()
Now that DHCP is set to point to TFTP, we need to setup a TFTP server. For the lab, Solarwinds TFTP server is used. A simple install, and TFTP server runs as a service. An new directory, c:\TFTP-Root, is created.
From the vSphere web client, browse to Inventory Lists > vCenter Servers, (vCenter Server) > Manage, select the Manage tab, and choose Auto Deploy. Click the link to download the TFTP Boot Zip. Unzip the contents into the c:\TFTP-Root directory.
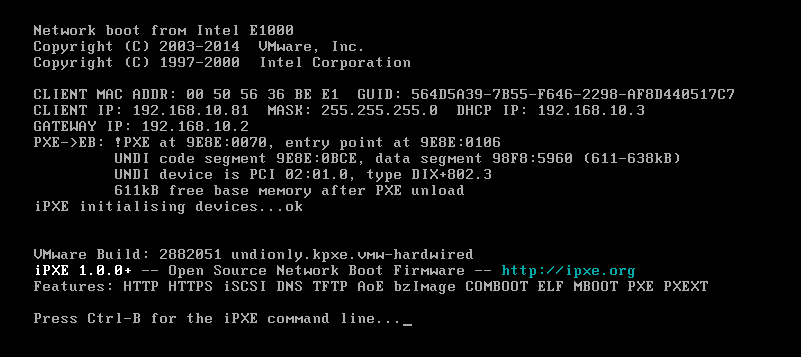
The network is now all set for the empty host VM to boot, and contact the TFTP server. The next step is to use PowerCLI to setup autodeploy images and rules.
- Using PowerCLI, connect to the vCenter using Connect-VIServer command.
- Add the ESXi 6 offline depot
- Add-EsxSoftwareDepot ESXi600-201601001.zip
- (Download this from VMware.com)
- Create a new profile by cloning the newly uploaded profile
- New-ESXiImageProfile -CloneProfile “ESXi-6.0-xxxxxxxx-standard” -Name “Nested_Profile”
Deployment rules are used to assign PXE boot hosts to a particular image. In production, these would be used to make sure Dell servers boot with the dell-ESXi image, and HP with the HP custom ESXi image. In our lab, we will simply use the default ESXi image, and tie it to our reserved IP, 192.168.10.81.
- Create a new deployment rule to assign the profile to our host
- New-DeploymentRule -Name “Nested” -Item “Nested_Profile” -Pattern “ipv4=192.168.10.81-192.168.10.83”
- This will allow us to boot 2 additional hosts, .82 and .83 and have them get the Nested_Profile image.
- New-DeploymentRule -Name “Nested” -Item “Nested_Profile” -Pattern “ipv4=192.168.10.81-192.168.10.83”
- Create a deployment rule to assign the hosts into an existing cluster in vCenter
- New-DeploymentRule -Name “Default-Cluster” -Item “Cluster_Name_Here” -AllHosts
- Finally, add these 2 rules into the rule set to apply them.
- Add-DeployRule Nested
- Add-DeplyRule Default-Cluster
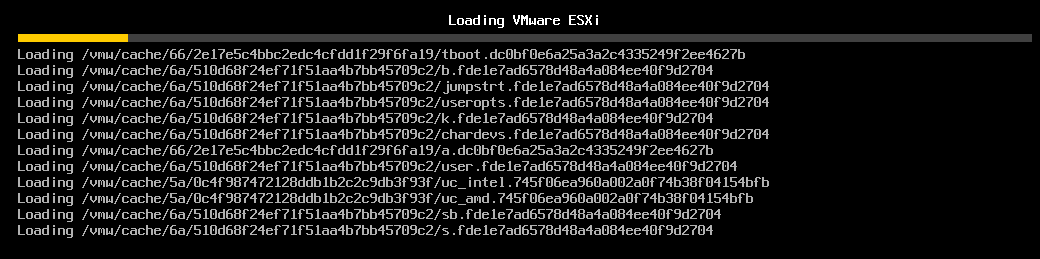
Now, auto deploy is all set, and the empty ESXi VM can be powered on. The VM will PXE boot, contact the TFTP server, and download the image, then, be joined into the defined cluster.
The host will have no config, and in a production environment, we would use host profiles to define vSwitch settings, log locations, root password, etc.
I have a question. Why do you create a new profile cloning “ESXi-6.0-xxxxxxxx-standard”?
Why don’t you just use the last one in the Deployment rules? Thanks for the VCAP Deploy Series!
This was a greenfield and no profiles existed yet. So, after importing, a clone needs to be made so it can be edited.
you are correct following not required
New-ESXiImageProfile -CloneProfile “ESXi-6.0-xxxxxxxx-standard” -Name “Nested_Profile”
you can use ESXi-6.0-xxxxxxxx-standard instead
Note: but you should clone only if you would like to modify esximageprofile to add additional driver vibs..